Navigation
| Homepage | Current Courses | Teaching Portfolio | Writing Portfolio | Presentations |
| Janus | Personal Interests | Lifelong Learning | Astronomy | Classical Greek |
| Dholuo | Atheism |
Quick Links
Personal
Return
Personal
Interests
Crochet
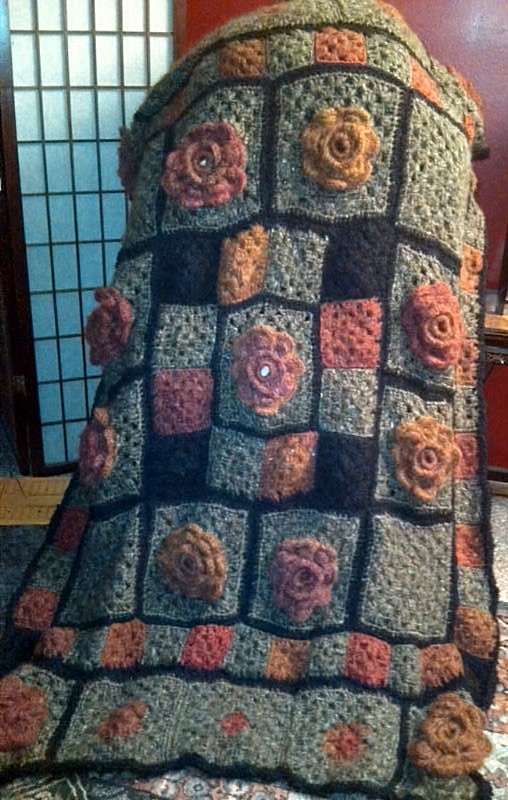
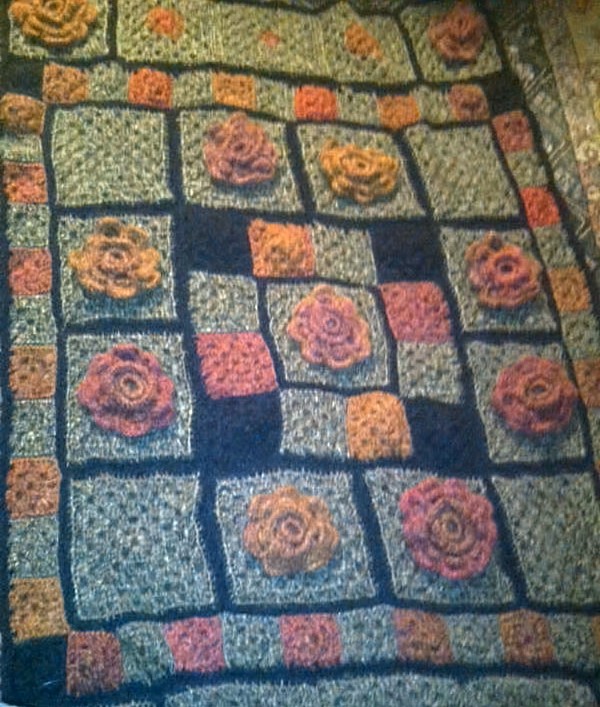
Dusky Rose


This afghan is constructed from the Winter Rose granny square (from 50 Fabulous Crochet Squares by Jean Leinhauser & Rita Weiss by Leisure Arts), here slightly modified, and your more common granny square pattern.
Materials used: Size I crochet hook, and 3 yarns: Colour A: Rusty Red (16 oz), Colour B: Medium Olive Green (24 oz), and Colour C: Black (28 oz). I used thinner fashion yarns and doubled them for a bulky look and texture. Tapestry needle.
Rose square: Make 13.
With Colour A, Ch 10 and join with slip stitch to form ring.
Rnd 1. Ch 1. 16 sc in ring. join with slip stitch to first stitch.
Rnd 2. Sc in same stitch, *ch 2, skip next sc, sc in next sc. Repeat from * around until you have 8 chain spaces. Join with slip stitch to first sc.
Rnd 3. In next chain space (sc, hdc, sc), sc in front loop only of next sc. Repeat from beginning around and join in first sc.
Rnd 4. Ch 5, sc in back loop from round 2. Repeat around and join.
Rnd 5. In each ch space (sc, hdc, 3 dc, hdc, sc). Repeat around, join.
Rnd 6. Ch 6, sc around post of sc between petals on previous round. Repeat around and join.
Rnd 7. In chain space (sc, hdc, 5 dc, hdc, sc). Repeat around and join.
Rnd 8. Ch 7. sc around post of sc between petals on previous round. Repeat around and join. Fasten off Colour A. 8 chain-7 spaces.
Rnd 9. With Colour B, join with slip stitch in any chain space. Ch 3, 2 dc, ch 3, 3 dc, ch 1 in same space. *In next chain space, 3 dc, ch 1. In next space, 3 dc, ch 3, 3 dc in same space. Repeat from * around until beginning space. Join with slip stitch. Slip stich to corner.
Rnd 10-11. Complete these rounds like traditional granny squares, with (3 dc, 3 ch, 3 dc, ch 1) in each corner, and (3 dc, ch1) in every chain space besides.
Rnd 12. ch 1 after join. Sc in each stitch and chain around, with three sc in each corner. Join with slip stitch to chain and fasten off Colour B.
Rnd 13. Join Colour C and repeat round 12.
In addition to the rose squares, you will need the following standard granny squares:
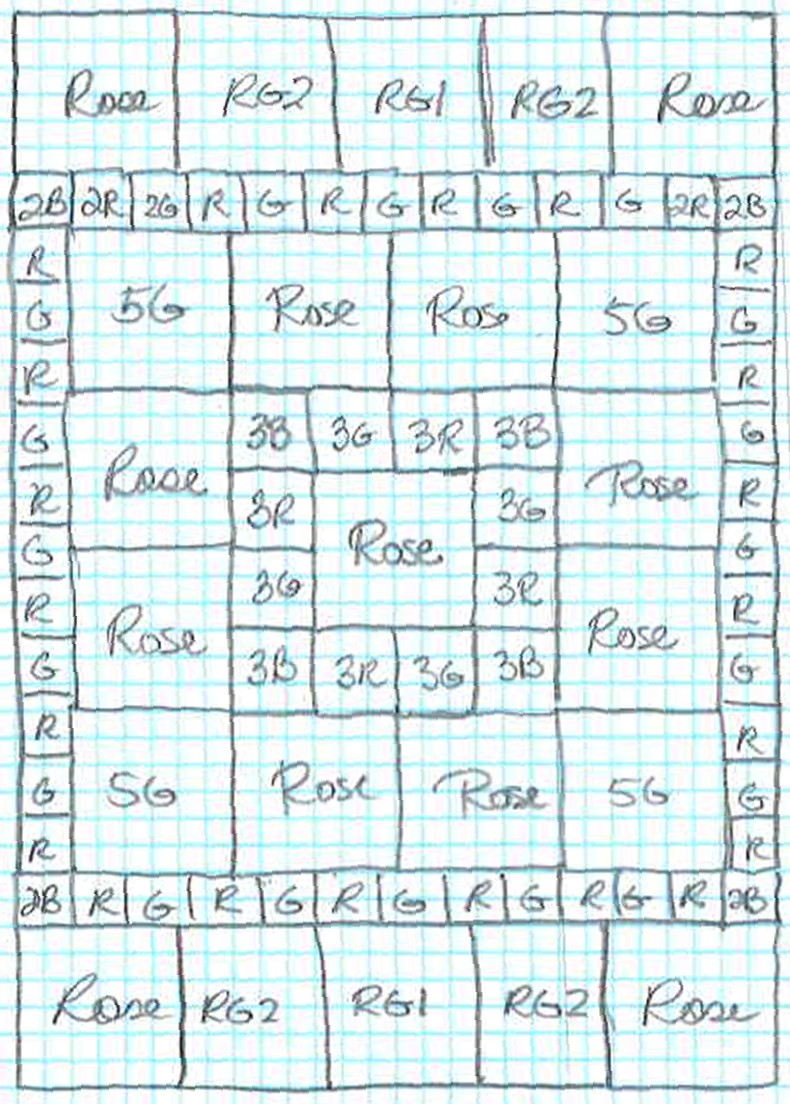
5-round granny squares: 4 in Color B only (marked 5G in layout plan below). Around outside of each granny (for this type only), complete Rounds 6 and 7 as we did Rounds 12-13 of the Rose block.
3-round granny squares: 4 in Colour A, 4 in Colour B and 4 in Colour C (marked 3R, 3G, 3B respectively in layout plan below)
2-round granny squares: 24 in colour A, 20 in Colour B, and 4 in colour C (marked 2R or just R, 2G or just G, and 2B respectively in layout plan below)
5-round granny squares: first round Colour A, remaining 4 rounds colour B, sc a border around before finishing off: make 2 (marked RG1 in layout plan below).
5-round granny squares: first two rounds Colour A, remaining 3 rounds Colour B, sc a border around before finishing off: make 4 (marked RG2 in layout plan below)
Assembly:
Starting in the center with one rose block, whip stitch using back loops only 3-round grannies around central rose block as shown below. I found it best to assemble the two side blocks and attached to each side, and then do the corner blocks last. Using Colour C, sc a border around and fasten off.
The next round is attached with the Rose block, 2 each, attached to each side of the center block, whip stitched as above. Then attach the 5-round Colour B blocks in the corners as shown.
Assemble the two-round blocks as follows: starting with colour A, B, etc. alternating and ending with A. Use 6 A blocks and 5 B blocks. Once these are assembled, attach to one side of the center afghan. Repeat with the next 2 strips, but adding one C block for the corner. Finally, the last strip should have one colour C block on both ends of the strip to complete the round. Using Colour C, sc a border around and fasten off.
For the top and bottom rows, assemble the three color B blocks first, with the 1-round in Colour A version in the center, and 2 rounds in colour B block on the ends. In colour C, sc a border around in Colour C. Then attach Rose blocks to each end. Lastly, attach entire strip to end each end of the central block and whip stitch across.
Finally, sc a border around to smooth out joins.

Lifelong Learning
| Homepage | Current Courses | Teaching Portfolio | Writing Portfolio | Presentations |
| Janus | Personal Interests | Lifelong Learning | Astronomy | Classical Greek |
| Dholuo | Atheism |
All rights reserved.
contact the Webmistress at betsy@pewtergallery.com
Last updated 2012 June 15