Navigation
| Homepage | Current Courses | Teaching Portfolio | Writing Portfolio | Presentations |
| Janus | Personal Interests | Lifelong Learning | Astronomy | Classical Greek |
| Dholuo | Atheism |
Quick Links
Personal
Return
Personal
Interests
Crochet
Blue Bell

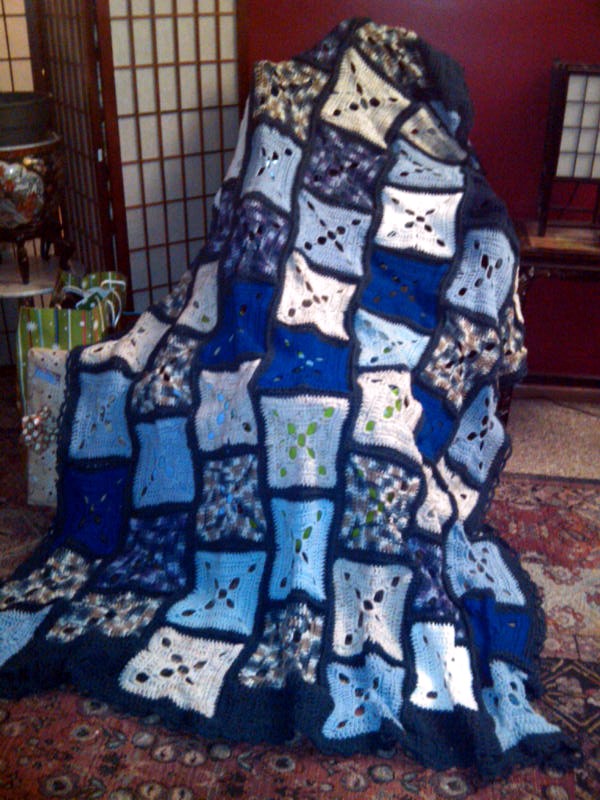
This afghan is based on a square I found in the Granny Square Book, by Margaret Hubert. I modified the instructions she includes very slightly, and so I post here what I did, together with the specific assembly instructions for the afghan which are my own.
Materials: 25 oz of dark blue (Windsor Blue)=MC, 15 oz white, 10 oz light blue, 8 oz royal blue, 12 oz of blue variegated (blueberry) and 10 oz of a second blue variegated shade. I crochet hook.
Square: Make 67 in a variety of colours (other than MC).
Chain 10. Join with slip stitch to form Ring.
Round 1. Ch 3, 3 dc. *Ch 7,
3 dc in ring. Repeat from * three times. Ch 7 and join with slip stitch to
top of beginning ch-3. (forms a square)
Round 2. Ch 1. Sc in next 2 stitches. *in Ch-7 space: 4 sc, ch 2, 4 sc. sc in each dc. Repeat from * to last ch-7 space. slip stitch to ch-1.
Round 3. Ch 3. *dc in each sc across to corner. In Ch-2 space: dc, ch 7, dc. Repeat from * to end. slip stitch in top of beginning ch-3.
Round 4. Ch 1, sc across in each dc to ch-7 space. *in Ch-7 space, 4 sc, ch 2, 4 sc. sc in each dc. Repeat from *. Slip stitch in first ch-1.
Round 5. Ch 3. *Dc in each stitch across to ch-2 space. 3 dc in space. Repeat from * across to end. Join with slip stitch in beginning ch-3 space. Fasten off.
Round 6. In MC, join with slip stitch, ch 1. *sc across in each dc. sc, ch 1, sc in each corner stitch. Repeat from * around. Join with slip stitch to first ch-1. Fasten off.
Assembly:
Join squares in 4 rows of 10 squares, and 3 rows of 9 squares. Successive squares in each row should be of different colours, otherwise, they can be relatively random.
To join two squares in each row, place wrong side to wrong side, using MC, join with slip stitch in both corners, sc in front square in the next space. *Skip a stitch and put next sc in the back square. Skip a stitch and put the next sc in the front square. Repeat from * across to corner. Fasten off.
When the 7 rows are completed, line up a row of 10 next to a row of 9, so that the end of the row of 9 starts halfway down the first square of 10. Use clips to hold the row together so that the row of 9 ends at the halfway point of the final square. Each seem in each row should be centered on the square of the opposite row. Join the rows as before using MC all the way across. Continue alternating rows until all have been joined in the order 10-9-10-9-10-9-10.
Border:
Round 1. Using MC, join at one corner with right side facing at the top (short side). Sc across the top of the square to corner. Ch 3 at corner, turn 90-degrees and 10 dc. Using a reducing stitch in the 4 spaces at the corner: yo, insert hook and pull up loop, yo and pull through 2 loop; repeat in next 3 spaces, then yo and pull through all the remaining loops on hook. dc across, and repeat reducing stitch in corner. 8 dc to end. Ch 3, turn, and repeat, reducing the number of stitches with each loop around the corner until the space is filled in. When the space is flush with the original square, resume the sc across. Repeat in the next two gaps. Sc to corner. in corner space, sc, ch 1, sc. Sc across the entire side. repeat corner space. On short side, repeat pattern from first side. Repeat corner and long side.
(Alternatively, you can make 1/2 squares 23 stitches across by 10 stitches high. Join to rows as with joining squares. then sc around entire row, with sc-ch-1-sc in each corner.)
Round 2. Ch 3. dc in each stitch across the top. dc, ch 2, sc in the corner. Sc across the long side. sc, ch 2, dc in corner. Dc across the top. dc, ch 2, sc in the corner. Sc across the long side, sc, ch 2. Join with slip stitch to corner.
Round 3. Ch 7. Slip stitch in same stitch in corner. *Ch 7. Slip stitch in 4th stitch from hook. Repeat across the top to the corner. At the corner, ch 7, slip stitch in same stitch. Repeat around from * to end. Slip stitch in base of first ch-7 space. Fasten off.
Lifelong Learning
| Homepage | Current Courses | Teaching Portfolio | Writing Portfolio | Presentations |
| Janus | Personal Interests | Lifelong Learning | Astronomy | Classical Greek |
| Dholuo | Atheism |
All rights reserved.
contact the Webmistress at betsy@pewtergallery.com
Last updated 2011 December 30